
Detailed Preferences
Objective
In this article you will learn how to change preference options in Corenexa.
How To
In the Preferences pages the user can control different aspects as to how CoreNexa operates.
The user has the option to Reset Defaults in the lower left of the Preferences which will reset all default application settings.
General Settings
In General Settings the user has the ability to set their language and time zone preferences.

Meetings Settings
Meetings settings allow users to control settings around meetings and rooms.
Sort Rooms Alphabetically changes the default room list to be strictly alphabetical. The default view shows occupied rooms first and then un-occupied rooms following.
Disable screen-saver while in meetings will not allow the computer's screen-saver to kick on when the user is in a meeting or room.
Enable sounds when users enter/leave meeting will disable the tone that plays when a user enters or leaves a meeting or room.
Disable in-meeting animations changes how video tiles are displayed. If this box is checked, video tiles will quickly appear / disappear instead of appearing to grow / shrink.

Audio Settings
On the Audio Settings page, the user can control the volume of Notification Sounds with the slider near the top of the page. Note that if your speaker or microphone aren’t listed, click on ‘Rescan Devices’ at the top right of the page. Devices may need to be re-scanned if they were plugged in after (or unplugged while) the application is running.

Using the two ‘Test’ options let the user test the devices they’ve selected.
The user can also choose on this page to have the microphone automatically be on when he or she enters a meeting.
The option to Adjust your microphone volume automatically is also known as automatic gain control. It attempts to adjust the input volume of the microphone automatically if the user is not speaking loudly.
Enabling the echo suppression is helpful if the user is using a standard microphone and speakers. It may not be needed if a headset is used.
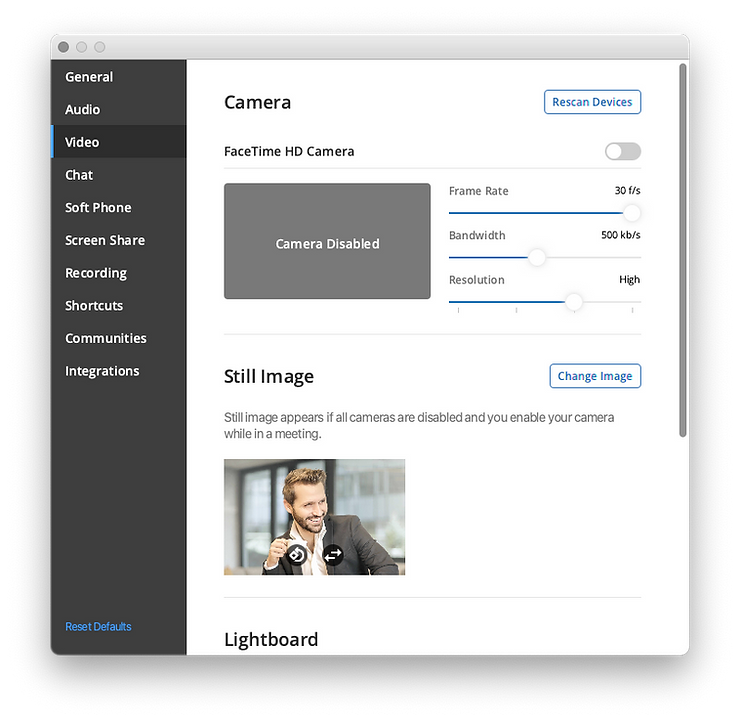
Video Settings
The Video settings control how cameras operate within CoreNexa. The slide button next to each camera controls if that camera will be used during a meeting. You can have multiple cameras enabled in CoreNexa.
Frame Rate will have an effect on the amount of upstream bandwidth that is consumed. The default is 30 frames per second (fps).
Bandwidth lets the user control the maximum upstream bandwidth they want to allow this camera to consume.
Resolution is the maximum resolution that will be used by the camera. The higher the resolution and frame rate, the more bandwidth will be required for upstream video.
Still image is a little different from the Large Avatar that’s seen in meetings if your camera is off. Still image is used if the user enables their camera in a meeting but all cameras in the system are disabled. Clicking on Change Image will allow the user to select a picture file from their computer’s hard drive.
Scrolling down in the Video page will reveal settings for Lightboard and other options.
The Key color is the color within the screen share window that will be mapped out with the output of the computer’s camera. The transparency slider allows the user to leave some of they key color mixed with the camera output.
The check box to flip the camera image for Lightboard is useful for presenters so pointing to items on the lightboard output is more natural.
The ‘Camera on when entering meeting’ option ensures that the user’s camera will be on when entering a meeting room vs. having to enable it each time.
Automatically grouping user videos and/or shared screens keeps video tiles better organized within the video window by keeping them together as one.
Show only participants with video helps to preserve ‘real estate’ in the video area of the application.
Enable 3D effects changes how video tiles are presented in a meeting for Click to Select and Active Speaker views.

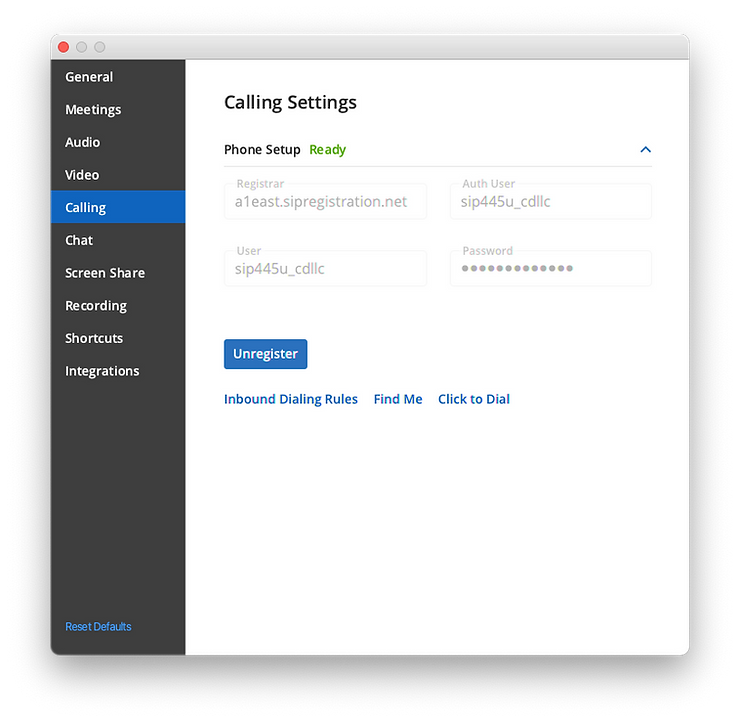
Calling Settings
The soft phone and calling settings are automatically populated if a CoreNexa user account with voice services enabled logs in. In the case where a third party PBX is utilized, the SIP settings may be manually configured.
The ‘Unregister’ button can be used to sign out of voice services.
Inbound Dialing Rules
Clicking on ‘Inbound Dialing Rules’ will allow the user to control how inbound calls are routed.
Call Forward Always if enabled allows the user to always have calls routed to a Mailbox, Extension, Outside Line or to a SIP Trunk.
Do Not Disturb if enabled will cause calls to be handled by the user's ‘If Busy’ inbound dialing rule as seen lower in this settings page.

Rules
The rules are used to route the call when Call Forward Always and Do Not Disturb are disabled. If the ‘Try First’ destination is another extension, then that extension's rules will be used.

The Ring Options control how the above Locations behave (ring timer, caller name announcement) and whether the caller has the option between each location to be sent to voicemail.
The Time Settings all the user to control when the calling can occur and how to handle the call after hours.

Click to Dial
The ‘Click to Dial’ option allows the user to control if the phone rings to a deskphone or stays within the application when a click to dial item is clicked on. This is useful if the user has no headset or audio devices on their computer.

Chat Settings
The following chat options available to configure.
Enable incoming chat sounds allows the user to turn off system sounds for each incoming sound.
Disabling ‘Show notifications when minimized’ will cause incoming application notifications from being seen on the computer when CoreNexa is minimized.
‘Show notifications on for selected chat’ is disabled at the time of this writing.
System messages are messages from the CoreNexa servers related to the user experience or the meeting experience. Messages will be sent if the user (or other participants) is having poor performance issues due to their system or internet connection. The setting here allows for On, Off or ‘My Messages Only’.

Screen Share Settings
The ‘Pause new screen share by default’ setting allows the user to enable screen sharing, adjust the frame to be shared and then begin sharing by ‘un pausing’ the screen share.
‘Allow remote control’ allows the user to determine if remote control will be allowed on the computer. At present this is disabled in the beta.
‘Show mouse pointer when remotely controlled’ will determine if the mouse pointer is seen locally when in a remote control session and another user is remotely controlling the computer.

Recording Settings
CoreNexa users who are moderators for a meeting are allowed to record a meeting. The recordings are stored locally on a PC. In the Recording settings the user can change where the recordings are saved.
The user has the option to record only audio of a meeting with the ‘Record audio only’ option.
By default when recordings are stopped, they will be saved with a date in the recording name. With the ‘Manually enter recording name’ option, CoreNexa will prompt the user to change the recording name.

Shortcuts Settings
Shortcuts allow users to perform different actions in CoreNexa with keypresses.

Integrations
The Integrations settings allow a user to add or remove Google and Microsoft connections.
